Want some inexperienced in that small area? Develop up! This straightforward DIY will present you ways.
Take your inexperienced thumb to new heights (and small areas!) with a vertical backyard.
This DIY is an effective way to combine somewhat greenery into any area, together with an residence or small porch.
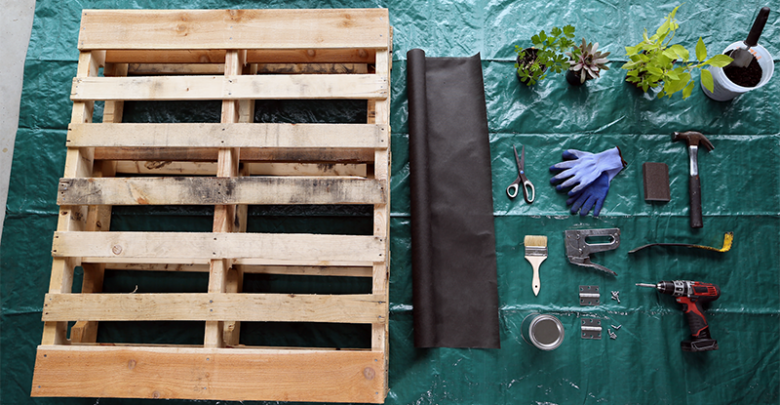
Provides:
Two pallets
Tarp
Hammer
Pry bar
Gloves
Security goggles and ear safety
Sanding blocks or sandpaper
Paintbrush
Water-based stain
Water-based clear sealant
Two three 1/2-inch utility hinges
Screws
Panorama material
Staple gun and staples
Screwdriver or screw gun
Scissors
Natural potting combine
Fertilizer
Vegetation
A be aware on plant selection: Earlier than you go wild on the backyard heart, think about your vertical backyard’s placement.
To develop most greens, herbs, succulents and annual flowers, you have to at the least six hours of direct daylight. A shady spot limits your selections, however you’ll be able to nonetheless create a lush planting of shade-loving foliage crops, begonias and coral bells.
Many greens and annuals will solely reach sure situations, so learn the tags to resolve in the event that they’re proper for this season. Lastly, think about the potential measurement and behavior of every plant earlier than packing them into such a small area.
1. Supply heat-treated pallets
Many pallets are handled with poisonous chemical substances, so search for the initials “HT” to pick heat-treated pallets. The wooden also needs to be arduous, clear and comparatively easy.

2. Add area by eradicating boards
Carrying ear and eye safety (it’s a loud course of!), take away each different board with a pry bar. It will give crops daylight and room to develop.

three. Sand tough spots
Carrying gloves, take away any particles. Sand down the splinters and tough edges, hammering down or changing any protruding nails.

four. Apply waterproof stain
For an ornamental end, apply a water-based wooden stain. Utilizing a paintbrush, paint alongside the grain of the wooden, and wipe off any extra stain with a rag.
For those who’re rising greens or herbs, line the within with plastic earlier than planting. It will forestall chemical substances from leaching into the potting combine.

Permit the stain to treatment for at the least 24 hours. As soon as dry, apply a layer of water-based clear sealant to guard the wooden from the weather.
5. Join pallets with hinges
Stack the 2 pallets collectively, making certain that the underside edges are stage. Connect the hinges to the perimeters of the pallets with screws, inserting them about one-third and two-thirds of the best way down for stability.
You might also select to drill pilot holes first to forestall splitting.

6. Reduce panorama material
Since pallets are available in all sizes and shapes, use the primary sheet of panorama material to create a template. It ought to present ample planting room, in addition to about an inch of overlap for the stables.
When you’ve examined the template, minimize the remaining sheets to the identical measurement.

7. Line pallets with material
Create a pocket by tucking the panorama material into the opening, and staple it in place alongside the periphery. Repeat for the remaining pockets.
If further moisture retention is required, embody an additional layer of material.

eight. Add natural soil
Earlier than including potting combine, transfer the pallet backyard to its remaining location, ensuring that it’s going to obtain sufficient daylight for the crops you’ve chosen.
Fill every pocket about three-fourths of the best way full with moisture-retentive potting combine. Put aside some potting combine as a way to add a layer after planting.

9. Add fertilizer
If the potting combine doesn’t already include fertilizer, sprinkle fertilizer over the floor in keeping with label directions.
10. Add crops
Earlier than planting, water every plant to maintain their brittle roots from breaking. Then slip every plant’s rootball out of the pot, soil and all. Gently tease aside the roots along with your fingers, and nestle them into the potting combine, one after the other.
Since extra water will drip all the way down to the bottom pockets, fill the higher pockets with drought-tolerant crops akin to succulents, sedums, rosemary and lavender. Within the decrease pockets, incorporate thirstier crops like ferns, basil and mint.
As soon as the crops have been organized to your liking, cowl with one other layer of potting combine, and calmly sprinkle with water to assist the combo settle across the roots.

Caring in your vertical backyard
Water the uppermost pocket each morning, permitting sufficient water to achieve the opposite crops. Chances are you’ll have to water two to a few occasions for thirstier kinds of herbs and greens, notably on sizzling days.
Feed crops as soon as every week with a liquid fertilizer to switch any vitamins that leach out from the potting combine.

Now it’s time to get pleasure from your vertical backyard and its bounty.
As crops outgrow their area, transplant them to the backyard or bigger containers. You might also select to start out from scratch every season, planting an entire new backyard from seeds or transplants.
Associated:


