Who doesn’t need to lower your expenses on utility payments? place to start out is by insulating your ducts.
Insulation isn’t free, however because the previous saying goes, typically you need to spend some to make some. In the case of including duct insulation, your month-to-month financial savings in utility payments will quickly cowl the prices, particularly if you happen to set up the insulation your self.
The issue with uninsulated ducts
You want insulation – even round your ducts – regardless of the place you reside. Insulation isn’t solely about preserving warmth in. It additionally retains the warmth out of the house (or duct).
Within the common dwelling, round 20% to 30% of the heated or cooled air flowing by the ducts is misplaced to leaks and uninsulated surfaces, in response to the Division of Power. The result’s increased utility payments, put on and tear on the heating and cooling system, and issue sustaining the temperature inside your property. Moreover, uninsulated ducts can accumulate condensation, which finally results in rust. As soon as the ducts begin rusting, you face having to put in new ducts.
Evaluating your ducts
First, take into account the duct location. The higher the temperature excessive between the air contained in the duct and the air surrounding the ductwork, the higher your want for duct insulation.
Sadly, so many homes — particularly newer houses — find yourself with ductwork operating by the attic. Unheated basements, crawl areas below the house and even garages are additionally unconditioned (neither heated nor cooled) runs for ductwork.
If, alternatively, your ducts run throughout the ceiling of a heated basement or inside well-insulated partitions and ceilings, your want for duct insulation is minimal. Nevertheless, if the ducts have plenty of leaks, the air that makes it to your rooms won’t be as heat or as cool as supposed. So duct loss issues it doesn’t matter what.
Then there’s the duct materials itself. Most heating and cooling ducts are metallic. These are the cumbersome, grey box-shaped ducts so widespread in all places. Generally metallic ducts are lined with duct liner, a 1-inch-thick fiberglass board that insulates the inside of the duct, quite than the outside. Duct liner isn’t typically a DIY set up, and in case your ducts have already got liner, you don’t have to insulate the outside.
Duct board, very like the duct liner, can be a fiberglass product. Produced from 1- to 2-inch-thick sheets of inflexible glass fiber and coated with an aluminum laminate for a moisture/air barrier, duct board is available in sections that match collectively like metallic ducts. Duct board’s benefit is that it’s already insulated, eliminating the necessity for additional work, so long as it’s structurally sound.
One other product, often known as flex duct, is a spherical framework of wires coated with fiberglass and encased in both foil or plastic to withstand moisture and air leakage. Though versatile ducts don’t require additional insulation, they’re susceptible to break, particularly punctures. Since they’re typically used for brief runs, when engaged on the rest of your ductwork, examine any flex ducts as effectively.
Sorts of duct insulation
As soon as you establish that your duct wants insulation, take into account the kind of insulation you need. To insulate the outside, you might have a selection between sleeve-style insulation and blanket wraps, which accurately wrap across the ductwork.
To put in sleeves, you have to both disassemble the ductwork and slide it on earlier than reassembling the ducts or — as many owners discover themselves doing — slit it and wrap it round just like the blanket-style materials. In the long run, it’s most likely finest to purchase the blanket insulation.
Duct insulation sleeves: Are available in pre-measured lengths. They might have an adhesive strip to make the set up somewhat simpler. Widespread sleeve supplies embody foam, bubble wrap and fiberglass, all usually that includes a foil-like outer floor to supply air and moisture resistance. To suit your ducts, merely lower the sleeve to size with a pointy pair of scissors. Like some other insulation, use further layers to supply higher insulation energy.
Foil-backed self-adhesive foam duct insulation: Installs simply and wraps round irregular ductwork areas effectively. Most manufacturers are available rolls a foot in width and several other ft lengthy. Whereas pretty skinny, it really works effectively to dampen sound and might be mixed with different varieties to extend the insulation score. Better of all, you eradicate the fiberglass in that space of your property. Nevertheless, by no means apply simply any foam to your ductwork — solely formulation designed for the applying. Many foam merchandise are extremely flammable and poisonous when burning.
Fiberglass and cotton duct insulation: This sort usually consists of an aluminum foil backing to repel moisture invasion or air leaks. Obtainable in quite a lot of thicknesses, rolls are often a foot large and several other ft lengthy. It’s usually a less expensive type of insulation, although the tip worth depends on putting in it correctly. Fiberglass and cotton are simply lower to dimension.
Foil-backed bubble wrap: Might not ship the insulation energy and vapor barrier efficiency you anticipate if you happen to go for a less expensive model. One other disadvantage is that as a reflective insulation, you have to present an air hole between the duct and insulation itself. Particular spacers are bought to make sure this hole. Alternatively, you’ll be able to lower squares of the insulation and line the size of the duct with these squares, tape or glue them in place, then set up the insulation. Use sufficient to make sure the size of outer insulation doesn’t contact the duct anyplace. That is fairly a problem, so think twice earlier than selecting this duct insulation model.
As new and modern merchandise come up regularly, these are under no circumstances the one sorts of duct insulation accessible, nor will they continue to be the primary varieties. When evaluating any sort of duct insulation, make notice of the set up methodology, the drawbacks and the benefits, in addition to the insulation energy, often known as the R-value. Discuss to others about what works for them and store round earlier than selecting any insulation for any a part of your property.
Contemplating your insulation R-value
Extra necessary than the kind of insulation (offered it’s put in correctly) is the R-value of the insulation you employ. R-value is the measure of the power of the insulation to stop warmth from both penetrating or escaping the article insulated. The upper the R-value (actually that means resistance worth), the higher the insulation works. Nevertheless, there’s a ceiling on the efficient R-value as a result of, at a sure stage, the price of the fabric turns into higher than any further financial savings.
Earlier than choosing your duct insulation, decide the optimum R-value to your area. Generally, the colder your local weather, the upper the R-value you will have. Even then, totally different areas of the house might require higher or lesser insulating energy. As a rule of thumb, anticipate to put in a minimal of R-5 materials. To be exact, seek the advice of the Division of Power’s Duct Insulation R-value Chart.
When choosing your duct insulation, use the R-value you require to find out what product — or mixture of merchandise — you want. Use multiple layer if a single layer received’t provide the worth you need.
Testing and sealing: the vital first steps
Properly-meaning owners generally make a pair errors when insulating their ducts. First, some don’t understand which you could’t use paper-backed fiberglass insulation. Maybe probably the most generally used insulation for joists and partitions, the fiberglass itself is ok, however it doesn’t take a lot to get the paper sizzling sufficient to burn. By no means use something not particularly supposed to be used with HVAC ductwork.
The second mistake is much more widespread: DIYers usually don’t perceive that they need to seal the ducts first. Failing to carry out this primary step will undermine your insulating efforts. Irrespective of how effectively you put in the insulation or how excessive the R-value, even with the moisture/air barrier connected to the outside of the insulation, it received’t forestall air and temperature loss in case your ducts aren’t structurally sound.
Some ducts, relying on the fabric and the situation, are extra susceptible than others in the case of air loss, however any duct has the potential to leak. With age, home settling, rust from moisture, animal intrusion and quite a lot of different hazards, your ducts might receive something from pinholes to gaping voids, free and leaking connections between items, and even doubtlessly lacking ducts. Your joists or wall studs may very well type the “duct” run if a portion of your HVAC ductwork is lacking — or the air might merely pour out to the outside.
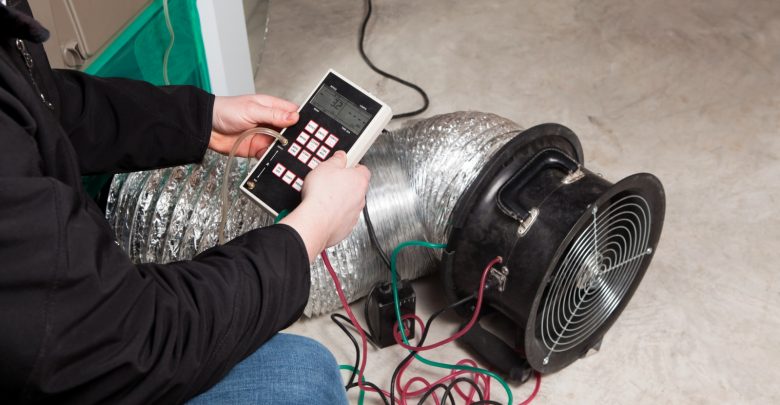
To make sure you aren’t losing your time, cash and insulation, have a duct leak check performed earlier than sealing the ducts. Knowledgeable duct leak check identifies leaks inside your property’s ducts. Usually referred to as a duct blower door check, the technician seals the air consumption and outlet registers earlier than blowing air by the system. With the help of specialised instruments, the technician can decide the quantity of air leaking out of your ductwork and the place it’s occurring. Widespread downside areas embody across the registers and vents, the place they enter the room they service, and at every duct joint (connection).
Having your ducts examined provides to your expense, after all, with most professional inspections operating $100 to $200. Solely knowledgeable has the gear and information required, so it’s actually not a DIY-friendly job. Nonetheless, spending the cash will find yourself paying off in the long run.
Additionally, native constructing codes are regularly starting to require that new homes have a whole-house and duct blower door check carried out. How does this apply to you? At any level that you just make any improve involving your ducts that requires a constructing allow, you’ll have to comply with the present code. It’s additionally an excellent promoting level if you happen to ever put your own home available on the market.
To discover a skilled to carry out the work, strive your native utility firm, HVAC service firm or specialised testing corporations. The Division of Power offers glorious recommendations on selecting your technician. Additionally search for vitality effectivity credit that could be accessible by the utility firm or the state or federal authorities for testing and insulating your ducts. This may occasionally offset your prices considerably.
Sealing and insulating: getting all the way down to work
Some duct testing corporations will seal the ducts for you, eliminating leaks and holes, as both a part of the service or for a further payment. Do what you’re snug with — if you happen to really feel assured about doing the sealing your self, will probably be messy.
In the event you resolve to proceed with out testing your ducts, carry out a radical examination, on the lookout for any rust, holes, severely broken items, free connections or lacking parts, beginning on the furnace and air unit and dealing again to the final register within the dwelling. Mark downside areas with a marker or chalk. After the inspection, seal your ducts, preserving just a few ideas in thoughts:
Begin with clear, dry ducts. You don’t have to clean them, however wiping them with a moist fabric or whisking them with a brush and ensuring the floor is dry will assist the sealant-to-duct bond.
Choose your required sealant, or use a mixture of merchandise as applicable. Mastic is the commonest sealant, however specifically formulated duct sealant, in cans or caulk tubes, can be accessible. Silicone caulk will work in small areas.
Select a tape to make use of with the sealant when essential. Particular foil tapes work effectively, or choose a mastic tape. By no means use duct tape — it won’t stick for lengthy. Generally, solely use the tape by itself when you don’t have any different selection. Any tape tends to degrade or peel away with age, whereas mastic hardens to a stiff, sturdy floor. When the tape is used with the mastic, nonetheless, it really works very effectively.
Unfold duct mastic or sealant throughout the duct seams, joints and really small holes. Comply with the product directions for exact software directions.
Apply mastic in a layer about as thick as a nickel. A fair, beneficiant layer helps guarantee your duct won’t ever leak once more. Use a stiff-bristled paintbrush or your fingers to unfold the sealant. Put on rubber gloves to restrict pores and skin contact.
Put on previous garments throughout software. Mastic and different merchandise might not wash out.
Tape cracks or holes bigger than 1/Eight-inch diameter with the tape chosen. Cowl with the mastic to create a sturdy duct patch.
Seal all of the duct joints, holes and connections close to the furnace. Seal the duct-to-register connection as effectively. Wherever there’s a joint or intrusion, use sealant. Needless to say it’s higher to over-seal than to have a remaining leak.
Work from the furnace or air unit again to the final (farthest) register within the dwelling. This lets you prioritize your sealing efforts, making certain an important areas are coated. Holes, leaks and gaps nearer to the HVAC unit encounter increased air stress than these farther away, so your best financial savings and enhance in effectivity will come from sealing effectively at and close to the unit. Leaks additionally are typically widespread near the blower fan and the place the ductwork emerges from the furnace.
After the sealant is dry, the ultimate step is insulating the ducts. The method is straightforward if you happen to use a wrap-style insulation product. Earlier than starting, learn the product directions and comply with wherever they deviate from normal duct insulation pointers:
Measure and lower your duct insulation somewhat giant to permit overlap at each seam, each lengthwise and on the ends.
Wrap the insulation across the duct, permitting the start edge to trip up barely over the earlier piece.
Guarantee the fabric is turned the correct means; the vapor barrier ought to face out, and the fiberglass or different materials needs to be in opposition to the duct.
First staple, if attainable, then tape every seam, each lengthwise and between items. When overlapped 2 to three inches and secured with tape, every joint needs to be very safe and leak-free. Use a pressure-sensitive vapor retarder tape designed for ductwork.
Tape any punctures within the insulation’s vapor barrier to stop leaks.
Keep away from compressing the insulation. Most insulation depends upon the air area between its fibers to ship the R-value promised. When insulation is squeezed, flattened or compressed, its R-value drops tremendously. Some compression is unavoidable, corresponding to round bends.
As soon as your ducts are sealed and insulated, you’ll be able to have a technician retest your ductwork if you happen to need. Some corporations might supply the “after” check at no cost. Following these pointers and putting in all the pieces correctly ensures that your second check will blow the primary away — pun supposed — however higher but, your utility payments will present the distinction.


