On the lookout for a straightforward approach to personalize your area? These ornamental DIYs ought to do the trick.
These tasks are as lovely as they’re budget-friendly, and better of all, you may simply make them in a single afternoon. Able to study the ropes?
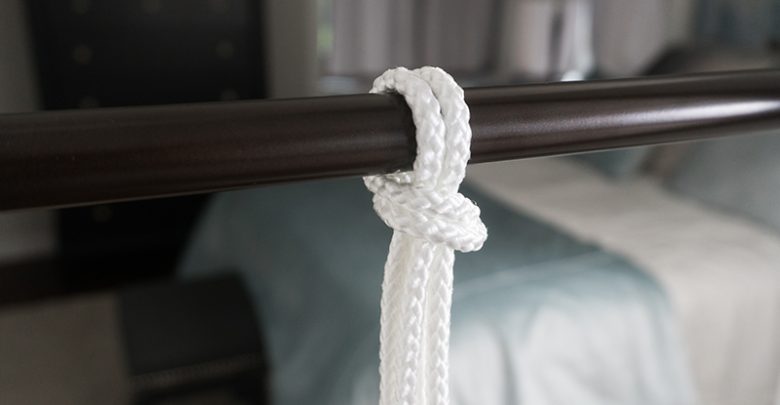
Macrame rope curtain
Fashionable, but rustic. Heat, but ethereal. And excellent for the doorway of your selecting.
Provides
Scissors
Rigidity rod
Masking tape
400 ft of 1/Four-inch diamond braided nylon rope
Directions
Choose a doorway to your curtain and set up the stress rod.
Reduce 18 strands of rope. Every one must be 17 ft lengthy.
Drape two strands of rope over the rod and line up the ends so you may have 4 even strands.
Safe the rope to the rod with a “four-in-hand” knot. To create this knot, maintain two strands of rope in every hand. Then, cross one aspect over the opposite. Subsequent, wrap the highest strands across the backside strands. Cross and wrap those self same strands another time, then pull them up and thru the loop earlier than tightening.
Repeat steps Three and Four with the remaining strands.
Now the actual macrame enjoyable begins! Tie a sq. knot three inches beneath the bottom of the highest knot. Seize the primary part of hanging rope. There must be 4 strands to work with (one on the left, one on the best and two anchor strands within the center). Place the strand on the left so it’s below the 2 anchor strands within the center, however over the strand on the best. Then, pull the best strand over the 2 anchor strands within the center and thru the loop on the left. Full your sq. knot by reversing the steps on the opposite aspect. Transfer the strand on the best below the 2 anchor strands and over the strand on the left. Pull the left strand over the 2 anchor strands and thru the loop on the best. Tighten it barely.
Repeat step 6 on every hanging part of rope. After finishing this step, each hanging part of rope ought to have a macrame sq. knot.
Now you’ll start to create extra rows of macrame knots by braiding rope within the adjoining rows. Begin three inches down from the primary row of macrame knots and work left to proper. Skip over the primary two strands on the left, and create a sq. macrame knot with the final two strands on the best aspect of the primary part and the primary two strands on the left aspect of the second part.
Repeat step Eight to work your means throughout the sections of hanging rope, making a second row of sq. knots.
Repeat step 6 to create the third row.
Repeat step Eight to create the fourth row.
Repeat step 6 to create the fifth row.
To verify the ropes don’t fray, wrap masking tape on the backside. Reduce by the tape to make the ropes even.
Admire your handiwork!

Rope basket
It’s identical to that basket you fell in love with in that cute boutique. Solely higher, since you made it your self.
Provides
Scissors
Glue sticks
Cotton piping
Scorching glue gun
Bucket for the mildew
Directions
Flip the bucket the other way up. Then, apply a skinny layer of glue to a Three-inch part of the piping and start to wind extra piping round it. Use the underside of the bucket as a information. Coil and glue the rope each few inches, till the bottom of your basket is just a little larger than the underside of the bucket. (Notice: Ensure you’re gluing the piping to different sections of piping, to not the bucket!)
Flip the bucket over. Proceed to wrap and glue the piping till the basket is 2 rows wanting the highest of the bucket.
Reduce the rope and glue down the ends for handles.
Take away the bucket rigorously. If it sticks to the piping, strive sliding one thing skinny and durable, equivalent to a butter knife, inside to separate the rope basket from the bucket.
Fill your basket (and brag about the way you made it your self)!

Hanging rope planter
Low on area however large on greenery? This mission is a game-changer.
Provides
Drill
Three/Eight-inch drill bit
Four-inch round protractor
Tape measure or ruler
Jigsaw
Pencil
Scissors
Masking tape
Four vegetation
Plant wire
Additional-strong glue, equivalent to Tremendous Glue
Four boards, every measuring 7 1/Four inches by 7 1/Four inches by Three/Four inches
Four espresso filters
Four-inch metallic ring
High quality grit sandpaper
Four terra-cotta pots, every Four inches in diameter
1 terra-cotta saucer
Four strands of three/Eight-inch jute or manilla rope, every Eight ft lengthy
Directions
Mark the middle level on three items of wooden. From that time, use the protractor to attract a circle.
Mark the corners on all 4 items of wooden to create a drilling level that’s Three/Four inch from every edge. Drill a gap in every nook and one within the middle level.
Utilizing the jigsaw, minimize a path from the middle gap to the sting of the circle. Comply with the curve of the circle to carve it out. Repeat on two different boards.
Sand the boards to take away any splinters.
Wrap tape across the ends of the rope to maintain it from fraying.
Knot the underside of every rope.
Thread the ropes by the nook holes of the plank of wooden that doesn’t have a middle gap. This would be the backside board.
Now it’s time to make a second knot within the rope. Measure 12 inches from the plank of wooden and tie a knot. Repeat this step for the opposite three items of rope.
Thread the ropes by the drilled holes in one other board and slide the wooden down till it rests on the knots.
Repeat steps Eight and 9 with the remaining items of wooden.
Collect the 4 unfastened strands of rope on the high, push them by the metallic ring and fold them over. Wrap plant wire across the ring to carry the rope collectively. 
Glue a saucer to the underside plank of wooden. This may catch any falling water droplets. Now, dangle your planter!
Pot your vegetation and pour them a pleasant chilly drink. And possibly have one your self, too.
Associated:


